We often need to display a single, specific node in a sidebar block on a Drupal site. In the past, there have been modules developed just for this purpose. And it's always been an option to create a View which will grab the node you want and make it available as a block.
Drupal 8 gives us another method of solving this perpetual requirement, one that hinges on a new feature in Drupal 8: custom block types. In a nutshell, you can now create custom blocks with all of the features and functionality that you're familiar with from creating content types, meaning that you can add as many fields as you need.
For our simple Node Teaser Block, we're going to create the slimmest and simplest custom block type we can, and then use an instance of this type to swiftly put a node in a block.
TL;DR
If you're familiar with creating content types, placing blocks, and so on, you'll be fine with this quick checklist version, which is unpacked below:
- Create a new block type called Node Teaser Block
- Add a content reference field
- Configured content reference field to use your chosen content type/types
- Set display options for Referenced Node to teaser (unless you want the default view)
- Create a new Node Teaser Block, selecting the specific node you want to appear
- Place your newly created instance in the desired site region
 Part 1: Create a Block Type
Step 1: Create a Custom Block Type
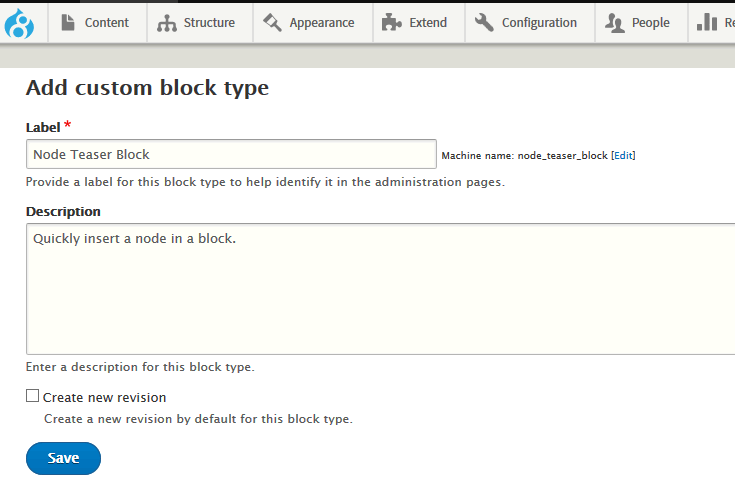
Go to Structure -> Block Layout -> Types and click on the Create New Type button. You'll be greeted with a familiar sort of form: enter the Name for your new block type. We'll use Node Teaser Block in this demo.
Step 2: Add a field to your Block Type
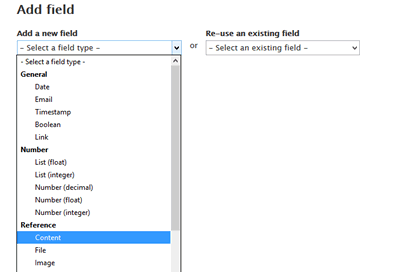 After you save your new block type, you'll find yourself on the Custom Block Library page. Click on Manage Fields for your Node Teaser Block, and you'll see a brief list of the default fields for new block types (i.e. the Body field). Click on Add New Field and you'll arrive at another new page. From the option list, select Content from the Reference group of possibilities. You'll have to give your new field a label - "Referenced Node" will do.
Step 3: Configure the content reference field
You'll pass through a couple of screens in this process. On the first, simply set the field Allowed number of values to one. The next screen is the important one: choose which content type or types will be available when you create an actual instance of this block. (Remember, we're just creating a Block Type now - not an actual block.)
Once you've chosen at least one content type, Save. You'll be back on the Manage Fields page.
Step 4: Configure display mode for your fields
One last step, which again will be familiar if you've created content types: set the Label and Format display options for your Referenced Node field. This step is very slightly tricky, but only because it's not always apparent whether your work has been saved or not.
 The default settings here are not very useful. First of all, we'll deal with the most important part: set the Referenced Node Format to Rendered Entity. Then click on the Settings gear, and change the View Mode to Teaser (unless you're very certain that you want entire nodes to appear in blocks). Click on Update - and very importantly, click on Save before you continue with other configurations.
Finally, drag the Body field to the Disabled area, and set the Reference Node Label to Hidden, and Save again. (An optional step here is to disable the Body field under the Form Display settings tab - it's just clutter for this particular block type.)
Done - at last. Your Node Teaser Block type is ready to use. Here's how we use it.
Part 2: Add a node to a block and place it
Part 1 only needs to be done once (thankfully!). Part 2, on the other hand, can be done as many times as you want - whenever you have a specific node to place in a sidebar.
Step 1: Add an instance of the Node Teaser Block type to your site
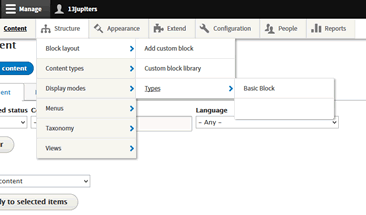
Go to the Structure -> Block Layout -> Add Custom Block page. This lists, of course, all of the Block Types available at your site - the Node Teaser Block we just created, and likely Basic Block too. Select Node Teaser Block.
Fill in the Block Description with something concise and informative - this content won't be displayed on the site, but will be used by you when you place/administer blocks. Ignore the Body field if you didn't take the above step of removing it from Form Display. Finally - the payoff - start typing the title of the node you want to place in the Autocomplete "Referenced Node" field. Save.
Step 2: Place the block on your site
Go to Structure -> Block Layout, and click on the Place Block button beside one of your theme's regions. We'll use Second Sidebar for this demo. In the list of available block, you'll see the one you just created - a custom block with the Block Description you chose in Step 1.
Conclusion
This approach works best for fairly static content, such as a brief version of an About Me page or something similar. It's not the way to go for a block that's supposed to show the Latest News or Newest Blog etc etc - in those cases, Views will be better suited to the job.